OBD2 Readiness Monitors are simple yet powerful self check routines. They provide insight to the car’s self-diagnostics. This tutorial will explain in detail what the readiness monitors are.
The purpose of readiness monitors is to self-test the car’s emission control systems. The monitors are also known as Emissions Monitors. Like the name indicates, they observe the performance of car’s emission related systems.
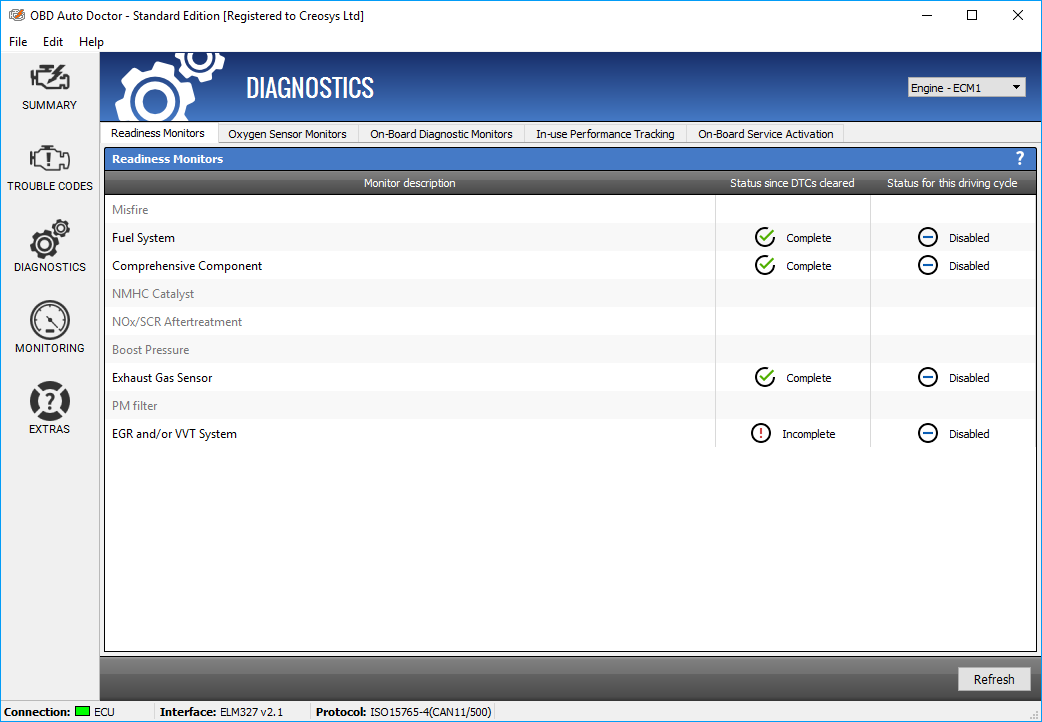
Cars may perform up to 11 system tests or routines. These tests are so called readiness monitors. The output of readiness monitors tell you whether the car’s computer has completed the tests successfully.
Readiness Monitor types
There are two different types of readiness monitors: continuous and non-continuous. Continuous monitors are different in design from the non-continuous ones. Continuous monitors are being constantly tested and evaluated while the engine is running. The non-continuous monitors need certain conditions to be met before a test can be completed.
The conditions necessary to run the non-continuous self-diagnostic tests vary. Some monitors require that the car follows a predefined drive cycle routine. Some require two drive cycles because of the need for a cool down and warm up periods between. Each emission monitor can have different requirements for the conditions.
Previously, the OBD2 standard (SAE J1979) categorized each defined monitor as either one. In the latest standard edition, this definite allocation is no longer present for all of them. Thus, OBD Auto Doctor doesn’t follow the categorization anymore either.
Continuous or Non-continuous Monitors
These monitors can be of either type. It’s up to the manufacturer to decide.
- Misfire
- Fuel System
- Comprehensive Component
Non-Continuous Monitors
Non-continuous monitors are different for spark ignition cars (gasoline engines) and compression ignition cars (diesel engines).
Spark ignition vehicles (Gas)
- Catalyst (CAT)
- Heated Catalyst
- Evaporative (EVAP) System
- Secondary Air System
- Oxygen (O2) Sensor
- Oxygen Sensor Heater
- EGR (Exhaust Gas Recirculation) and/or VVT System
Compression ignition vehicles (Diesel)
- NMHC Catalyst
- NOx/SCR Aftertreatment
- Boost Pressure
- Exhaust Gas Sensor
- PM Filter
- EGR and/or VVT System
OBD readiness monitors read with Windows
Monitoring cycles
Traditionally, the only monitor status was the status since the diagnostic trouble codes were cleared. This readiness monitor status is mandatory for all OBD2 compliant vehicles. It will show the long term status after the check engine light was reset and the DTCs cleared.
As the OBD2 has evolved, newer vehicles can now report emission monitor status also for the current driving cycle. These monitors start from the beginning every time when the monitoring cycle begins. Older cars might not support this feature. In that case, OBD Auto Doctor will mark it as NA or Not Available.
Monitor status
Readiness monitor test result yields the monitor status. Each readiness monitor will have its own output status. The completion status can be:
Complete or ready meaning that the test has been completed. It means that the OBD-II system has checked this emissions control system and it has passed the test. OBD Auto Doctor indicates this by green check mark.
Incomplete or not ready meaning the test is not completed. It means that the OBD2 system has not been able to run this routine or it has failed. OBD Auto Doctor indicates this by red exclamation mark.
Disabled meaning that the test has been disabled for the rest of this monitoring cycle. A monitor can be disabled when there is no easy way for the driver to operate the vehicle to allow the monitor to run. For example, the ambient air temperature might be too low or too high.
OBD Auto Doctor lists all the defined monitors in the software. But the actual status can be reported only for the ones that the car supports too. It is not required for a car to support all the monitors. NA or not available monitor means that the car doesn’t have that monitor. Thus it can’t be tested.

Readiness monitors read with the Android app. The vehicle doesn’t support readiness monitors for this drive cycle.
Why is a monitor incomplete or “not ready”
Clearing the diagnostic trouble codes (DTCs) and the Check Engine Light will reset the monitor statuses too. This typically occurs during or after vehicle repair.
Statuses are also reset in case of power failure. This usually happens when the battery has been disconnected. That’s why it is not advisable to disconnect the battery. If you need to disconnect the battery for example to replace it, read further. You will learn how to get the monitors back to complete.
For the current monitoring cycle, or “this drive cycle”, the status is set to incomplete upon starting a new monitoring cycle. It is a normal situation for these monitors to be incomplete when starting the engine.
How to get the monitors complete or “ready”?
Because the monitors are self check routines, the best way to get them ready is to drive the car. Yet, monotonic driving will not most likely meet all the needed conditions. That’s why there is so called OBD drive cycle. But before going into that, let’s go through the obvious ones.
First, make sure that the MIL (Malfunction Indicator Light) is not commanded on. Having stored or even pending diagnostic trouble codes active may prevent a monitor from running to completion.
Second, make sure that you have enough fuel in the car. Some monitors, for instance the EVAP monitor, may require the fuel level to be between 35% and 85% to initiate the diagnostic testing.
Third, complete the so called “drive cycle”. About one week of combined city and highway driving is usually enough to allow the monitors to reach complete status. The drive cycle is explained in more details in the next paragraph.
OBD drive cycle
The purpose of the OBD2 drive cycle is to let your car run on-board diagnostics. This, in turn, allows the readiness monitors to operate. And detect potential malfunctions of your car’s emission system. The correct drive cycle for your car can vary greatly depending on the car model and manufacturer. Also, the monitor in question affects the required drive cycle.
Today, many vehicle manufacturers include these drive cycles in the vehicle owner’s manual. Typically, a few days of normal driving, both city and highway, will make the monitors ready. The following generic drive cycle can be used as a guideline if a specific drive cycle is not known. It will assist with resetting monitors when a car specific drive cycle is not available. However, it may not work for all cars and monitors.
The drive cycle can be difficult to follow exactly under normal driving conditions. Thus, it is better to drive it in restricted area!
The universal OBD-II drive cycle begins with a cold start. You should have coolant temperature below 50 C/122 F, and the coolant and air temperatures within 11 degrees of one another. This condition can be achieved by letting the car to sit overnight.
The ignition key must not be left ON position before the cold start. Otherwise the heated oxygen sensor diagnostic may not run.
Start the engine and idle the engine in drive for two and half minutes, with the A/C and rear defroster on if equipped.
Turn the A/C and rear defroster off, and speed up to 90 km/h (55 mph) under moderate, constant acceleration. Hold at a steady speed for three minutes.
Slow down to 30 km/h (20 mph) without braking. Do not depress the clutch if you are running with manual transmission.
Speed up back to 90-100 km/h (55-60 mph) at 3/4 throttle. Hold at a steady speed for five minutes.
Slow down to a stop without braking.
Get ready for inspection
To avoid rejection in the annual inspection, you can prepare your car for the check yourself. You should at least read the readiness monitors and make sure they are ready. This will save you from almost guaranteed rejection.
You should also read the diagnostic trouble codes and make sure there are none present. You can do all this with OBD Auto Doctor diagnostic software. You can read the monitor statuses and the diagnostic trouble codes even with the free version. So why not try the software right now?
And remember, do not wait until the annual inspection with the issues. Acting immediately could save you a lot of time as well as future repair and fuel costs.
Get started
Get started with OBD Auto Doctor for free. Download the software and start diagnosing your car!